Showing posts with label blogger tricks. Show all posts

How to Make the Blogger Posts Have a Calendar for the Date in


It's quite common to see calendar style dates next to some WordPress posts, however for the Blogger platform it wouldn't be an easy task to add it. But who said it's impossible? You don't have to look much further than this blog. In this tutorial i'll show you how to create a calendar style date for your Blogger posts.


How to create calendar style dates in Blogger


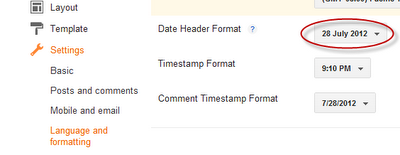
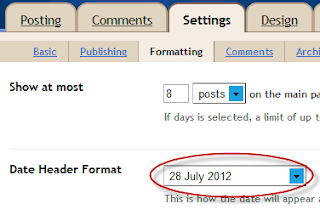
For adding the calendar style to our blog date header, we should firstly setup the displaying for the date. Log in into your Blogger Dashboard, go to Settings > Formatting - look for the Date Header Format option and change the date so that it is the first day, then the month and finally the year, for example: 28 July 2012 - see the screenshots below


If you're using the newer interface: go to Settings > Language and Formatting - Date Header Format and change the date format as you can see in my example below:

Now go to Design > Edit HTML > thick the "Expand Widget Templates" checkbox and search (CTRL + F) the following line:

<h2 class='date-header'><span><data:post.dateHeader/></span></h2>

If you find it twice, replace it twice with the code below:

<div id='Date'>
<script>changeDate(&#39;<data:post.dateHeader/>&#39;);</script>
</div>
<b:else/>
<div id='Date'>
<script>changeDate(&#39;&#39;);</script>
</div>

Now add the following code just ABOVE </head> (CTRL + F to find it)

<script type='text/javascript'>
//<![CDATA[
var DateCalendar;
function changeDate(d){
if (d == "") {
d = DateCalendar;
}
var da = d.split(' ');
day = "<strong class='date_day'>"+da[0]+"</strong>";
month = "<strong class='date_month'>"+da[1].slice(0,3)+"</strong>";
year = "<strong class='date_year'>"+da[2]+"</strong>";
document.write(month+day+year);
DateCalendar = d;
}
//]]>
</script>
<b:if cond='data:blog.pageType != &quot;static_page&quot;'>
<style type='text/css'>
/* Calendar style date
----------------------------------------------- */
#Date {
background: transparent url(https://blogger.googleusercontent.com/img/b/R29vZ2xl/AVvXsEi4GhF9YZ_beyKRnjidkK2A61VsW5E3IGL3iW1lhmBF3DlnziP7V1J7tuxhyVmgRvnAkcKw8r0yXIFJZcnubXVX5iXzfJqpBrdHj5E_7raNC48PrpJxfgeMqukWpx6lB6No8n5WmIDhLDzy/s1600/calendar07.png) no-repeat;
display: block;
width:60px;
height:60px;
float: left;
margin: 15px 2px 0 -108px;
padding: 0 0 8px 0px;
border: 0;
text-transform: uppercase;
}
.date_month {
display: block;
font-size: 15px;
font-weight:bold;
margin-top:-1px;
text-align:center;
color:#ffffff; /* Month's color */
}
.date_day {
display: block;
font-size: 28px;
font-weight:bold;
margin-top:-8px;
text-align:center;
color:#282828; /* Day's color */
}
.date_year {
display: block;
font-size: 10px;
margin-top:-8px;
text-align:center;
color:#282828; /* Year's color */
}
</style>
</b:if>
source

How To Add “Email Subscription Form” To Blogger Blogspot


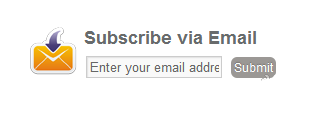
If you are providing useful information in your blog, then every visitor will want to get latest updates from your blog. For that purpose you need a Email Subscription Form in your blog, so that interested visitors can easily get latest updates. And to add email or feed Subscription Form to your blogger blog (blogspot) it's a very easy thing to do. So let's begin:

1. Log in to Blogger, then go to Design > Page Elements > click on "Add a Gadget" link. 
2. From the pop-up window, click on the "HTML/JavaScript" gadget. 
3. Paste the following code inside the empty box:
<style>
.hl-email{
background:url(https://blogger.googleusercontent.com/img/b/R29vZ2xl/AVvXsEg7fNMuobYaz1KasdZ_ff9TDqRXvye_7HDr_H8qrFBkp7ws5DP8I4LTeLGu6dVavPa2WmcODPLE2zFbYq7LCN0SSbu9PsKZH2LXKteIzF2y2eRuOPhiHJPufRnml8ryl01u_Ia17mtCnUo/s1600/mail.png) no-repeat 0px 12px ;
width:300px;
padding:10px 0 0 55px;
float:left;
font-size:1.4em;
font-weight:bold;
margin:0 0 10px 0;
color:#686B6C;
}
.hl-emailsubmit{
background:#9B9895;
cursor:pointer;
color:#fff;
border:none;
padding:3px;
text-shadow:0 -1px 1px rgba(0,0,0,0.25);
-moz-border-radius:6px;
-webkit-border-radius:6px;
border-radius:6px;
font:12px sans-serif;
}
.hl-emailsubmit:hover{
background:#E98313;
}
.textarea{
padding:2px;
margin:6px 2px 6px 2px;
background:#f9f9f9;
border:1px solid #ccc;
resize:none;
box-shadow:inset 1px 1px 1px rgba(0,0,0,0.1);
-moz-box-shadow:inset 1px 1px 1px rgba(0,0,0,0.1);
-webkit-box-shadow:inset 1px 1px 1px rgba(0,0,0,0.1); font-size:13px;
width:130px;
color:#666;}
</style>
<div class="hl-email">
Subscribe via Email <form action="http://feedburner.google.com/fb/a/mailverify" id="feedform" method="post" target="popupwindow" onsubmit="window.open('http://feedburner.google.com/fb/a/mailverify?uri=helplogger', 'popupwindow', 'scrollbars=yes,width=550,height=520');return true">
<input gtbfieldid="3" class="textarea" name="email" onblur="if (this.value == &quot;&quot;) {this.value = &quot;Enter email address here&quot;;}" onfocus="if (this.value == &quot;Enter email address here&quot;) {this.value = &quot;&quot;;}" value="Enter email address here" type="text" />
<input type="hidden" value="helplogger" name="uri"/><input type="hidden" name="loc" value="en_US"/>
<input class="hl-emailsubmit" value="Submit" type="submit" />
</form>
</div>

Settings 
  • Replace the url address in green if you want to change the email icon
  • Increase/Decrease the 130 width value for a wider text area
  • Replace http://feedburner.google.com/fb/a/mailverify?uri=helplogger with your Feedburner Email Feed link. You can get it by visiting your feedburner account then navigate to Publicize and then to Email Subscriptions.
  • Replace helplogger with your feed title. It appear at the end of your feed link. In my case it is http://feedburner.google.com/fb/a/mailverify?uri=helplogger


4. Save your widget and check your blog.

5. Rank your website by submitting this website Findeen.com  

[source]

Change Blogger Widgets Styles - Customize Blogger Widgets Stylesheet


In this post i`m gonna talk about customization or changing styles of Blogger widgets .

First thing you have to recognize and identify that widget in your template code in order to be able to add the required style .

Go to layout → choose edit for the targeted widget  →  in the navigation bar widget page link will look like this


http://www.blogger.com/rearrange?blogID=55897787887887&action=editWidget&sectionId=header&widgetType=HTML&widgetId=HTML7   

from this link gonna extract a lot of useful information that will help us in this tutorial and upcoming tutorials 

the link is divided to the following

blogID=55897787887887  → this is your blog unique id every blogger blog have only one unique id


sectionId=header  → this is the section position id of your widget you may use it if you wanna change the style of the whole section


widgetType=Null → this is the widget type 


widgetId=HTML7  → this is the id of your widget that we gonna use to change 


Now go to blogger template → edit HTML → check on expand widget templates box

and search for  </b:template-skin> then add your reqired style just before it for example where ( . ) represents Id

.HTML7{align:center !important;background-color:#999;color:#0000ff;text-decoration:underline}

this code will allow you to style your widget as follow :
align your widget to center
choose gray background
and blue color for text
and underline text decoration

u may use style for the whole section using section id we talked about as follow

.header {align:center !important;background-color:#999;color:#0000ff;text-decoration:underline;}


Of course you can pick what ever styles you want , note that you should use !important in case that the widget have another inline style

hope that helps good bye for next tutorial

How to change blogger mobile version template/theme

Blogger now enable mobile version. So you can increase your blog visitors by enabling blogger mobile version. 

Blogger has some awesome themes. If you enable blogger mobile templates now you can change them as you want. Its simple. 


How to enable blogger mobile version.  

  • Log-in to your blogger account.
  • Go to your blog dashboard.
  • Now go to settings>Email & Mobile.
  • Then under the mobile template select "Show mobile template on mobile devices"

How to change blogger mobile template or theme.  
  • Log-in to your blogger account.
  • Go to your blog dashboard.
  • Now go to settings>Email & Mobile.
  • Then under the mobile template tab select "Choose mobile template".


Top